How to Publish an Office Add-in to Microsoft AppSource: A Step-by-Step Guide
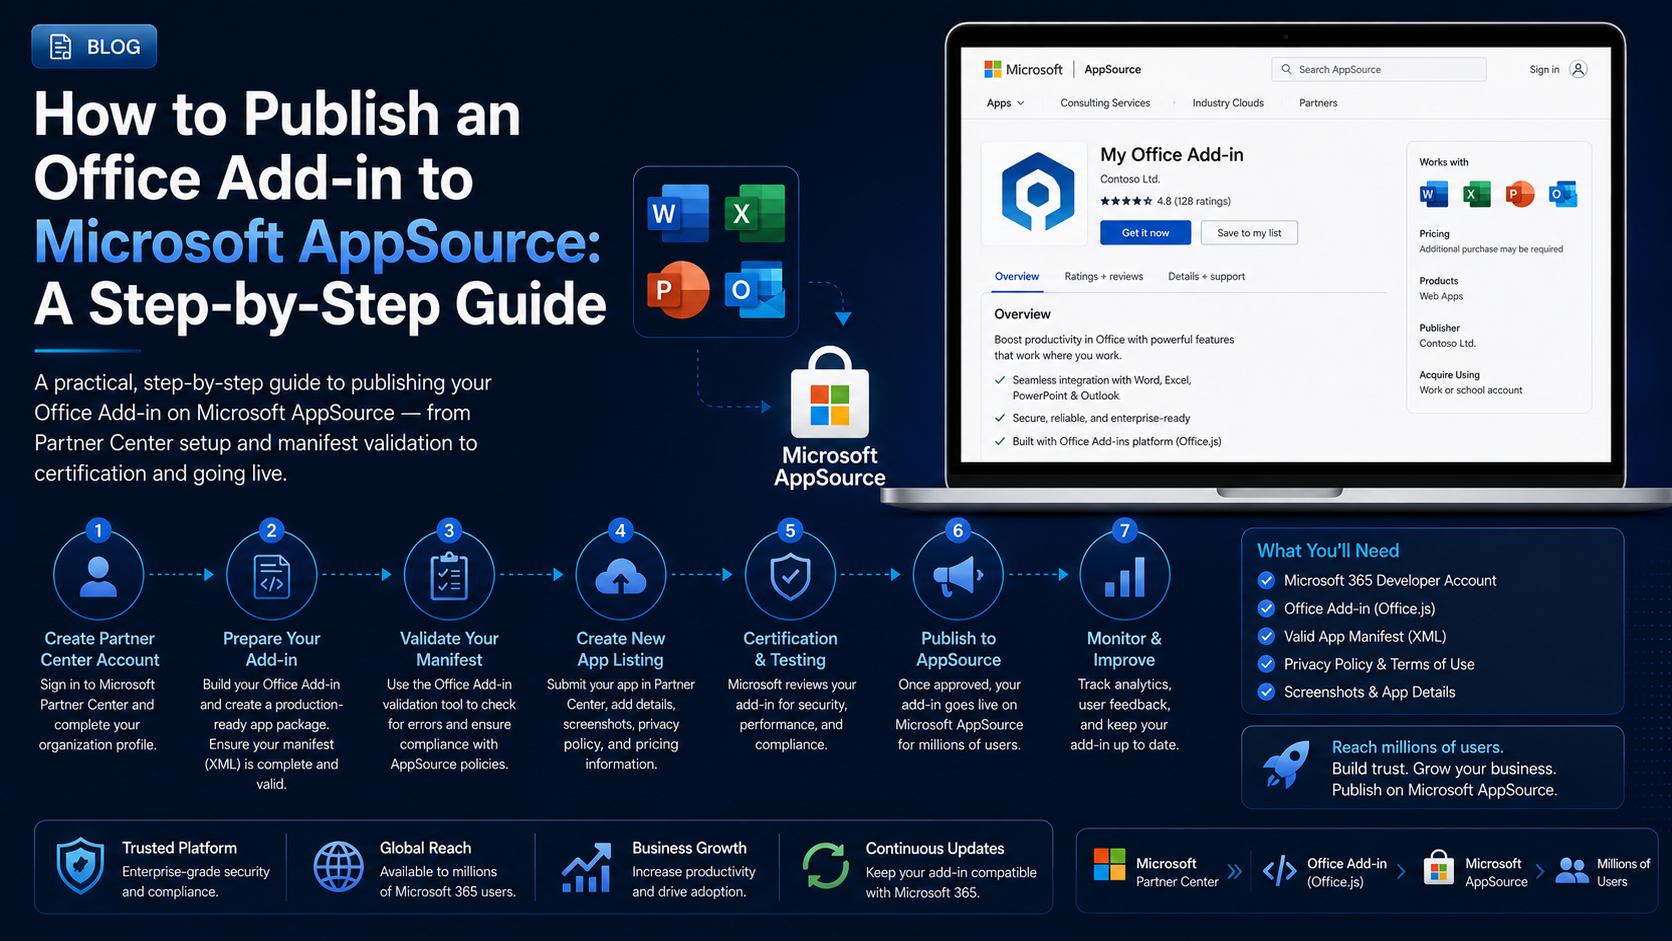
A practical, step-by-step guide to publishing your Office Add-in on Microsoft AppSource — from Partner Center setup and manifest validation to certification and going live.
Introduction
You’ve built a great Office Add-in — now you want the world to find it. Microsoft AppSource is the official marketplace where millions of Office users discover add-ins for Word, Excel, PowerPoint, and Outlook. Getting listed puts your add-in in front of that audience and lends it the credibility of Microsoft’s review process.
The publishing process has a few moving parts and a real certification review, so it pays to prepare. This guide walks through every step, from account setup to going live, and flags the things that most often trip people up.
What Is AppSource?
Microsoft AppSource is the public marketplace for business apps and add-ins across Microsoft 365. When users browse "Get Add-ins" inside Office, they’re browsing AppSource. A listing means anyone can find, install, and trust your add-in — and admins can deploy it to their organisation with a click.
Before You Start
Certification goes far more smoothly when everything below is ready before you begin the submission:
- A finished add-in whose web content is hosted on trusted, always-on HTTPS (not localhost or a dev tunnel).
- A valid add-in manifest with a stable, unique ID and production URLs.
- A public privacy policy URL and a terms of use URL.
- A support URL or contact where users can get help.
- Screenshots and a logo that meet Microsoft’s size and content requirements.
- Test credentials and clear steps if your add-in requires sign-in.
A privacy policy is mandatory
Validate Your Manifest
The manifest is the file Microsoft reads to understand your add-in, and a broken manifest is the most common reason a submission bounces. Validate it locally before you upload anything using the official tooling:
npx office-addin-manifest validate manifest.xmlFix every error and warning it reports. Double-check that all URLs point to your production host over HTTPS, that the add-in ID is a stable GUID, and that every icon and resource URL actually loads.
Test on every platform first
Set Up Partner Center
AppSource submissions are managed through Microsoft Partner Center. If your organisation isn’t enrolled yet, this is a one-time setup you do before your first submission.
- Create (or sign in to) a Microsoft Partner Center account for your company.
- Complete the account verification and enroll in the Marketplace program.
- Provide the business, tax, and payout details Microsoft requires for publishers.
- Once verified, open the Marketplace offers area to create a new offer.
Complete Your Listing
With an offer created, you fill in the storefront listing — this is what users see on AppSource, so it doubles as marketing. Take the descriptions seriously; they drive both discovery and installs.
- Name and summary — clear, benefit-led, and keyword-aware for search.
- Detailed description — what the add-in does, who it’s for, and key features.
- Logos and screenshots — meeting the required dimensions, showing the real UI.
- Categories and the Office hosts (Word, Excel, etc.) your add-in supports.
- Privacy policy, terms of use, and support URLs.
- The validated manifest / app package upload.
Write for the buyer, not the reviewer
Submit for Certification
When you submit, Microsoft runs automated checks and a manual review against its AppSource validation policies. A reviewer actually installs and uses your add-in, so anything that doesn’t work for them — or any credential they can’t get past — becomes a blocker.
Give the validation team everything they need in the testing notes: a test account, step-by-step instructions, and screenshots of the expected result. This single step prevents the majority of avoidable rejections.
Most common rejection reasons
- Provide working test credentials and clear testing steps.
- Make sure every feature in your description actually works in the submitted build.
- Respond quickly to reviewer feedback — the offer stays open while you fix and resubmit.
After Approval
Once certified, your add-in goes live on AppSource and becomes installable from inside Office. Because it’s a hosted web app, you can ship code and content fixes to your server instantly — users always get the latest version with no reinstall.
From here, keep an eye on your ratings and reviews, watch for issues as Office and browsers update, and plan a maintenance cadence so your listing stays healthy over time.
Conclusion
Publishing to AppSource is mostly about preparation: a clean manifest, a working add-in on trusted HTTPS, a complete listing, and clear notes for the validation team. Get those right and certification is usually smooth. Take it one step at a time, respond quickly to any feedback, and your add-in will be live in the marketplace before long. If you’d rather hand the whole process to a team that has shipped many AppSource listings, we’re happy to help.